Question: How do I load preset frequency scan groups to the 5000 Series 3rd Generation wireless?
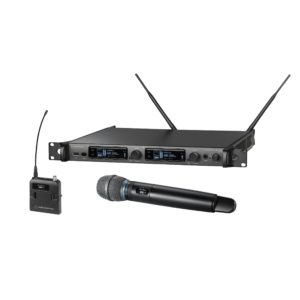
Answer: The 5000 Series 3rd Generation wireless allows integration with the Wireless Manager software, which lets you create an entire frequency plan based on the equipment you are using – the software accounts for known TV channels used in a particular city and executes a full frequency plan. With the ATW-R5220 receiver connected to the Wireless Manger software, you may also upload user-defined scan groups, as the receiver does NOT come with any scan group data preloaded. Below are instructions on how to quickly set up the Wireless Manger software and upload frequency scan group data, which will allow you to take a receiver on site and run an automatic frequency scan without using the software.
1. Before you begin, you will first need to download the latest Wireless Manager software zip file, as well as the “ATW-R5220DF1_ScanPlan_V1.csv” file that you will use to upload into the receiver. You files can be found within the “Download” tab on the 5000 Series (Third Generation) wireless systems page (here).
2. Install the software for your OS from the folder “Wireless Manager Installer.”
a. The Windows installer is available in both 32-bit and 64-bit. Please download the proper installer based on your computer’s specifications.
3. After installing the software, you will need to establish an Ethernet connection to the receiver. You can either connect the computer and receiver directly or connect them through an Ethernet switch.
a. Direct connection to receiver
i. Mac
1. Go to System Preferences > Network and select either Ethernet or Adapter – it should indicate green on the left.
2. Select to configure IPv4 Manually.
3. IP address: 192.168.0.25 (the default IP of the receiver is 192.168.0.20)
4. Subnet mask: 255.255.255.0
5. Exit out of the network settings.
ii. Windows
1. Go to Settings > Network & Internet > Ethernet and select Change adapter options.
2. Right-click on Ethernet and select Properties.
3. Click on Internet Protocol Version 4 (TCP/IPv4) the click on Properties.
4. Select Use the following IP address.
5. IP address: 192.168.0.25 (the default IP of the receiver is 192.168.0.20)
6. Subnet mask: 255.255.255.0
7. Click OK and exit out of all network settings.
iii. Receiver settings
1. Turn on your receiver and use the Control Dial to navigate to Network > IP Setting > and set the IP Mode to Static.
a. NOTE: The default IP of the receiver is 192.168.0.20 with a subnet that should match your computer at 255.255.255.0.
b. Press the back button on the receiver, which will inform you it needs to reboot. Select Reboot Now.
c. Go to Step #4 below.
b. Connect to the receiver through a network switch
i. Connect the receiver and computer to a network switch with Ethernet cables.
ii. Power cycle the ATW-R5220 to allow for an auto IP to be set up.
iii. It may be necessary to restart your computer as well.
4. Launch Wireless Manger
a. The software will automatically recognize the receiver and you will see a pop-up window containing the IP address of your receiver. If you don’t see a pop-up, try rebooting the receiver and the software.
b. Drag and drop the receiver to the Device List tab in the software.
c. Right-click on the device and select Device Setting.
d. Select the Group/Channel tab at the top of the window.
e. Select Import at the bottom left and import the “ATW-R5220DF1_ScanPlan_V1.csv” file which you previously downloaded.
f. Then select Apply at the bottom right.
g. The Wireless Manager software will push the scan group data to your receiver.
5. Run Automatic Frequency Scan with receiver
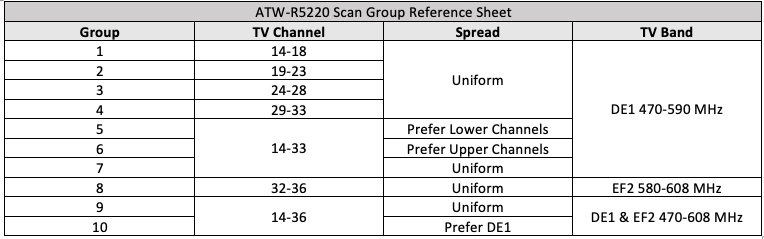
a. You will now be able to scan for open wireless channels from the front of the receiver. The user should use both receiver channels from the same scan group. Staying within the same scan group will offer 3TX/3rd order intermodulation-free frequencies.
6. For proper transmitter sync, the Groups/Channels must be downloaded via a sync from the receiver to the transmitter.
a. On the receiver, press the Control Dial and scroll to Utilities and press the Control Dial to select.
b. Turn the Control Dial to display Gr/Ch EDIT and press the Control Dial to select.
c. Turn the Control Dial to display Gr/Ch SYNC and press the Control Dial to select.
d. Turn the Control Dial to select the group you wish to transfer and then press the Control Dial.
i. DE1 transmitters should receive ALL of the groups except Group #8.
ii. EF2 transmitters only need Groups #8 - #10.
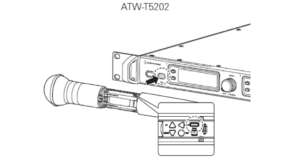
e. Press the Sync Button on the transmitter and position the IR windows so they face each other (see below).
f. Be aware of the transmitter bandwidth when syncing
You now have automatic frequency scanning data on your receiver which will allow you to run a frequency scan without the use of the software, if needed. For maximizing your frequency coordination, you may also use the Wireless Manager while connected to your Audio-Technica network receivers and create and deploy your frequency plan.
You may contact the Audio Solutions Department with further questions for loading the frequency scan plan into your receiver.


.webp)