Question: How do I use the ATND1061 Beamforming Ceiling Array Microphone software?
Answer: In this, the last of our articles on installing the ATND1061 Beamforming Ceiling Array Microphone, we will look at the Digital Microphone Manager software. The software allows an integrator to design and configure audio settings and audio zone coverage. Please refer to our previous posts to learn about the included accessories of the ATND1061 and how to wire, mount (flush, surface, VESA), and connect and control the microphone.
When the Digital Microphone Manager software is launched, you may choose to start a new project, open an existing project, or connect to an ATND1061 microphone on the same network as the computer.

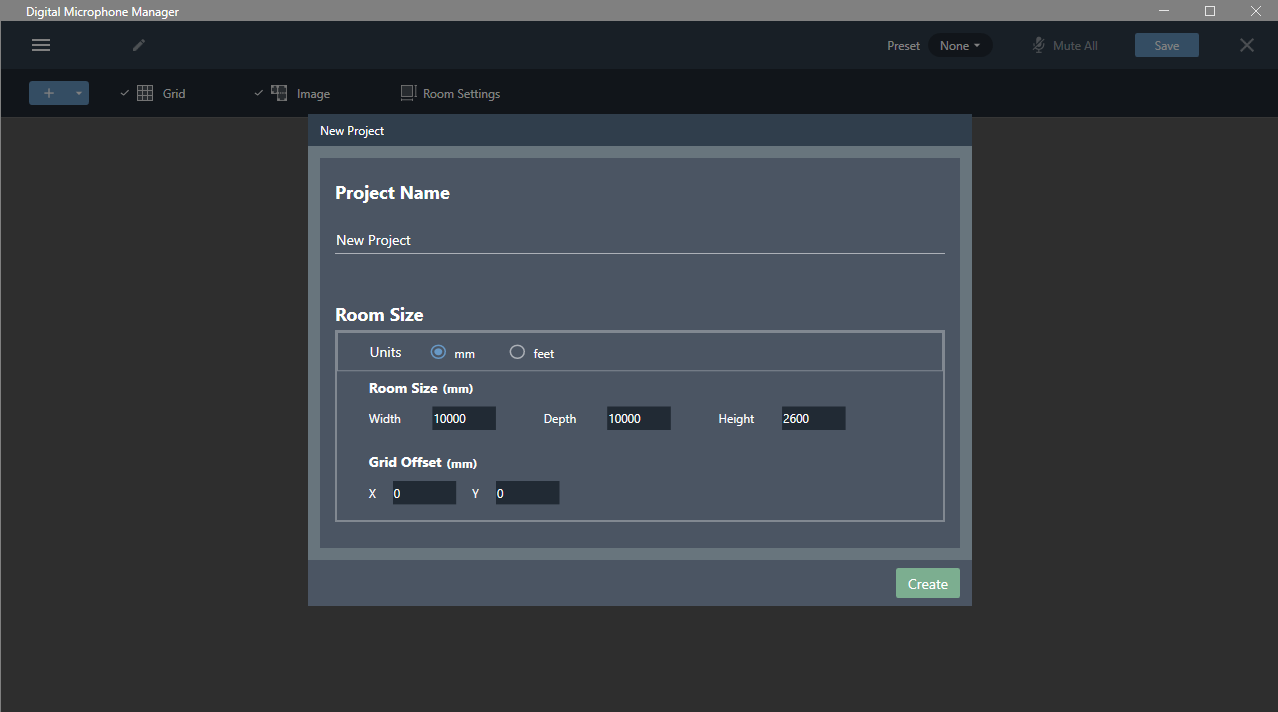
To start a new project, select New Project from the menu, which will walk the user through assigning a project name and setting the project’s room dimensions. These parameters can be modified after a project has been created, if need be, but it is recommended to start the project with the appropriate measurements.

To open an existing project, select Open Project from the initial menu. This will open the project file in an offline state and will not connect to an ATND1061 microphone. It is important to note that, once set up, the microphone does not need to be connected to the software to work; it will function even in an offline state. After making any desired changes, you can communicate with the microphone by connecting the computer to the same network on which the microphone resides. Refer to the previous blog post on connecting to the network, if needed.
To connect to the microphone, select Connect in the drop-down menu next to the desired microphone.

You may either push the current project from the software to the microphone or download the current project from the microphone to the software to amend any settings.

To connect directly and control a microphone on the network, select Connect Online Device on the initial menu. This will display a list of available devices on the network. Pressing the Identify button will cause the LED of the selected device to flash, allowing the integrator to easily verify the device. Selecting the desired microphone will open the project and allow room and microphone settings to be adjusted in real time.
The top of the screen displays the project name, preset drop-down menu, Mute All button, and Save button. Below that is the toolbar, which includes functions for adding microphones, adjusting grid settings, importing floor plan images, and modifying room dimensions.
Adding a microphone to the project will display the microphone icon, surrounded by a circle. This circle represents the maximum coverage area of the microphone. Note, the pickup is dependent on the height of the installed microphone as well as the height of the person talking. The microphone’s orientation in the design is marked by the arrow above the microphone icon. The orientation can be rotated 360 degrees. Digital Microphone Manager can support multiple microphones in a single space, each with its own adjustable settings.

Select anywhere within the microphone pickup area to reveal the Beam, Audio, and Camera tabs. The Beam tab consists of three types of user-defined zones. Selecting Coverage Zone or Priority Zone allows the integrator to draw the defined areas in which sound will be picked up by the microphone.

Priority Zones help in providing priority for areas where known participants will be located. Audio output channels 2 through 6 may be configured with up to 16 user-defined Priority Zones. This will ensure that talkers, seated or standing, in these defined Priority Zones receive audio priority over participants in Coverage Zones. However, Priority Zones may also be defined within an existing Coverage Zone. A maximum of five Priority Zones may be open at a time.
Audio output channel 1 can be configured with 16 user-defined Coverage Zones within which a meeting participant may be seated, standing, or moving around. The audio pickup beam will track the person talking and maintain focus on the person’s voice, minimizing other room noises. Only one of the 16 Coverage Zones can be open at a time with the microphone automatically selecting the zone with the strongest signal identified as speech. A Coverage Zone can be helpful in capturing audio from nonpriority or unplanned participants.

Exclusion Zones may also be set to maximize the noise-reduction and automatic-mixing functions of the microphone by identifying the sources of unwanted noise within a Coverage or Priority Zone. Additionally, Exclusion Zones may be used to account for irregular-shaped zones.

When any zone type is selected, the right column of the screen displays the unique X, Y, and Z settings for that coverage area. The Z setting is useful when areas need to be designated for varying heights.
When an ATND1061 microphone is connected and online, an activity dot appears within the pickup coverage area when a voice is detected. Pressing the Mark button will drop a marker for easy identification of the talker’s location. This is a useful tool when a room drawing is not available. The marker is temporary and only available within the Beam tab of the software.

Pressing the Settings icon will display the selected microphone’s unique settings, including network settings, beam settings, LED behavior, and other general microphone system information.
When selecting different assets in the project design area, the appropriate adjustable settings are displayed in the right column. Selecting inside the microphone pickup circle displays the audio levels of the respective channels in the design. The microphone can also be locked into place to avoid accidental movement during the design process. To do so, click the lock icon in the upper right corner of the right column.
Selecting anywhere inside of a Coverage Zone or Priority Zone will reveal the X, Y, and Z coordinates and audio metering of the selected zone. Clicking outside of the microphone’s pickup circle displays the project device list. The microphones in the design can be brought online from this list.
The Current View level box at the bottom right of the project area can be used to view the room layout from different elevations.
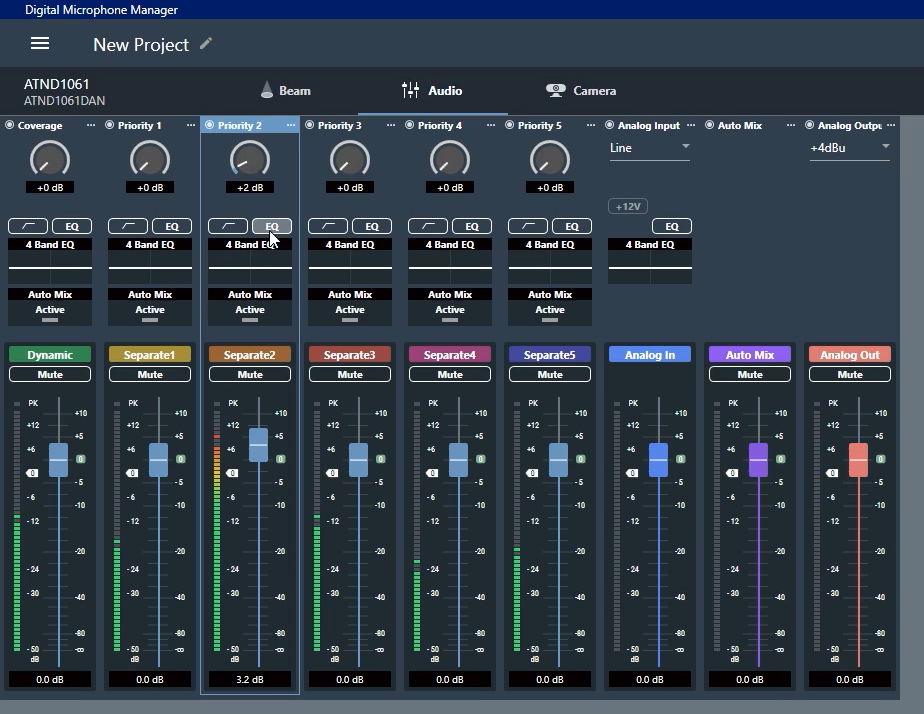
The Audio tab at the top of the screen displays each output along with its gain stage, EQ, Auto Mix, and level adjustments. Automatic Gain Control (AGC), Auto Mix, Acoustic Echo Cancelling (AEC), and noise-cancelling DSP settings can also be enabled and configured in this section.
The ATND1061 also outputs position data that can be used to trigger video switches, pan-tilt-zoom (PTZ) cameras and other video components. Select the Camera tab at the top of the screen to set up the eight user-defined groups.

For additional information see the product page for the ATND1061 Beamforming Ceiling Array Microphone or contact the Application Engineering Team at 330-686-2600 ext. 2998.


.webp)