This installment of our blog series on Basic Audio Techniques for Video explains several techniques for using tiny lavalier microphones to mike large areas. If you missed the previous installment explaining how to hide microphones on a film set to capture hard-to-reach dialogue, you can read it here.
 In this installment of our Basic Audio Techniques for Video, we’ll show you how you can use a tiny lavalier to mike a large area using a method called reflected lavalier miking. The reflected lavalier miking method is an easy option to capture natural dialogue or sound effects on sets where a larger microphone might be too intrusive or isn’t readily available. Continue reading to learn how to use this technique when filming your next video.
What Is Reflected Lavalier Miking?
The reflected lavalier miking method applies the same principle behind boundary or plate-style microphones – commonly used for teleconferencing or sound effects gathering – to lavalier microphones. In this method, a lavalier microphone is mounted to a large, nonporous surface that reflects sound waves, reinforcing the sound waves that travel through the air and hit the mic directly. The result is increased gain or volume, as well as a hemispherical pickup pattern reshaped from the original omnidirectional pattern.Examples of Reflected Lavalier Miking
 One instance where you may want to use reflected lavalier miking would be if you were filming a documentary in a classroom. While the teacher can be easily recorded using a wireless mic, wiring the students is out of the question and booming them would be too intrusive and distracting. Fortunately, by taking advantage of the wall-length whiteboard in the classroom and using it as the basis for your reflected lavalier miking, you can essentially turn your lavalier into a giant boundary mic.
 Another instance where you may want to use the reflected lavalier miking technique is to record crisp sound effects at a hockey match. To do so, simply plant a lavalier on the 80-foot-wide curved, Plexiglas barriers at either end of the ice rink to capture the scrape of the skate blades against the ice.
How to Set up a Reflected Lavalier Mic
To set up a reflected lavalier, begin by identifying the surface you’d like to turn into your sound gathering tool. Remember, a large, hard surface is ideal. Then, tape a lavalier microphone as close to the surface as possible.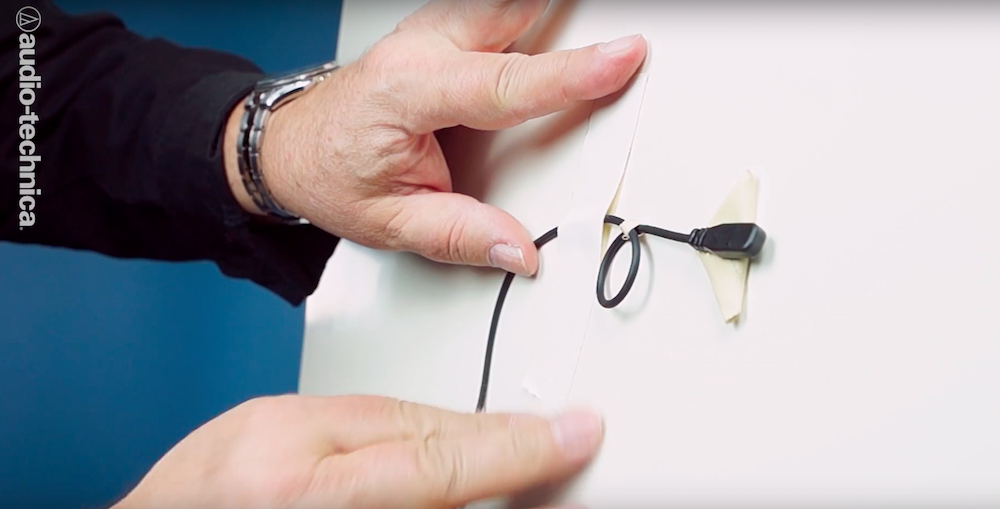 The sticky triangle mount works well to secure the lavalier to the surface, just reinforce it with a couple strips of tape. Don’t forget to loop the cable to hold back unwanted vibrations and handling noise.
 The most important thing is that the mic element should be close but not quite touching the reflective surface. We recommend leaving a business card’s thickness of space between the mic and the surface.


 You can fine-tune the setup by adjusting the spacing between the mic and the surface while monitoring the results on headphones. Sometimes a fuller sound can be achieved by minutely increasing or decreasing the gap, with a little help from tape to reinforce the ideal distance. You can also try moving the mic to a different section of the reflective surface to produce your desired sound. There are a lot of acoustic variables involved so don’t be afraid to experiment!
With this trick, even the smallest mic can pick up the largest spaces. In the video studio or on location, A-T has you covered!


.webp)